Hogyan telepítsünk autós sztereót | Egyszerű útmutató a fejegység cseréjéhez
A fejegység beszerelése vagy cseréje nehézségekbe ütközhet. Személy szerint mindössze 30 percet töltöttem egy fejegység cseréjével, egészen 4-5 óráig ugyanazon munkáért egy másik autóban. Számos változó határozza meg, hogy valójában mennyire nehéz és időigényes a feladat:
- Műszerfal és díszítőelemek – Tapasztalataink szerint a legnehezebb autók jellemzően németek. Audi, BMW, Mercedes, Volkswagen. A műszerfal és a kárpitelemek nagyon makacsok és szorosak, és nehezen eltávolíthatók.
- Kábelezés – A huzalozás autónként eltérő lehet. Ez nagyban függ az autó jellemzőinek számától. Például OnStar a GM autókon, vagy csak egy OEM erősített sztereó. Ezeket a dolgokat tudnod kell az autó bekötése és az illesztő kábelköteg megrendelése előtt (erről hamarosan bővebben is beszámolunk).
- Az új fejegység felszerelése – Ez különösen nehéz lehet, ha a barkácsolást választja. A legtöbb esetben azonban azt tapasztalhatja, hogy olyan szolgáltatóktól, mint a Metra és a Scosche, vannak adaptív „Dash Kitek”, amelyek leegyszerűsítik a sztereó felszerelését és telepítését.
Végső soron vannak olyan autók, amelyeknél javasolnám a sztereó korszerűsítését vagy cseréjét, és vannak olyan autók, amelyeket nem. Ebben az útmutatóban nem csak azon a folyamaton vezetjük végig, amely eldönti, hogy érdemes-e frissítenie autója fejegységét, hanem végigvezetjük a folyamaton, ha úgy dönt, hogy megteszi!
Frissítsem az autós sztereó fejegységet?
Mielőtt megvásárolná és beszerelné az általunk ajánlott legjobb autóhifi vagy GPS-navigációs egységeink egyikét, fel kell tennie magának a következő kérdéseket, hogy eldöntse, érdemes-e frissítenie vagy cserélnie a sztereóját, és milyen sztereóval érdemes frissítenie.
- Első kérdés – Az Ön autójában van már utángyártott fejegység? Ha ez a helyzet, akkor a telepítés nagymértékben leegyszerűsödik, mivel a vezetékezés és a szerelés már megtörtént. Csak annyit kell tennie, hogy kicseréli. Vegye figyelembe, hogy ki kell cserélnie az egység hátuljához csatlakozó kábelköteget. Ebben az esetben csak vágja le, és párosítsa a vezetékek színét a színnel.
- A fejegységem frissítése miatt elveszítik a járművem minden funkcióját? Sok új járműnek egymásra épülő rendszerei vannak, amelyek a sztereóra támaszkodnak. Például az én Ram 1500-amban vannak beállítva, hogy csipog-e a kürt, amikor lezárom, hogy a zárak automatikusan záródnak-e egy bizonyos idő elteltével, ha a lámpák égve maradnak-e, miután lezárom a teherautót. Mindezt a gyári fejegységemen keresztül irányítom. Sok járműben van ilyen. Ha az autója rendelkezik ehhez hasonló funkciókkal, amelyek a fejegységtől függenek, azt javaslom, hogy tartsa meg a sztereót. Ha több hangot keres, megteheti a sztereó frissítése nélkül.
- A járművemnek több képernyője van? Egyes esetekben az autóknak több képernyője van, amelyek összekapcsolódnak. Például sok Hondán van egy fejegység, majd van egy kijelző, amely a fejegységből származó információkat jelenít meg, például a rádióállomást vagy a CD-t. A sztereó cseréje használhatatlanná teheti a kijelzőt. Vannak esetek, amikor adaptereket készítettek, érdemes utánajárni, hogy van-e, mielőtt a fejegység cseréje mellett döntene. Vagy ha nem érdekel, folytasd!
- Miért fejlesztem az autórádiót? Ha mélynyomót vagy hangosabb hangszórót szeretne, akkor nem a fejegység az egyetlen lehetőség. Ha olyan funkciókat szeretne, amelyekkel jelenleg nem rendelkezik, például Bluetooth vagy AUX bemenet, akkor ehhez adapterek is vannak. Kulcsfontosságú annak eldöntése, hogy a cserehifi a legjobb megoldás-e az Ön igényeinek.
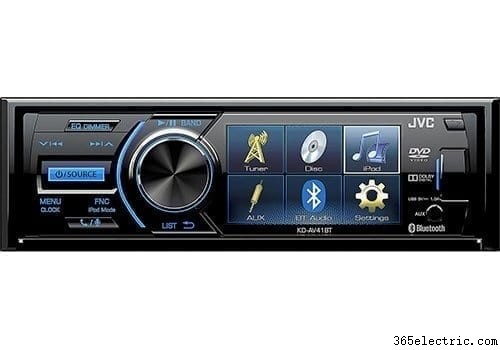
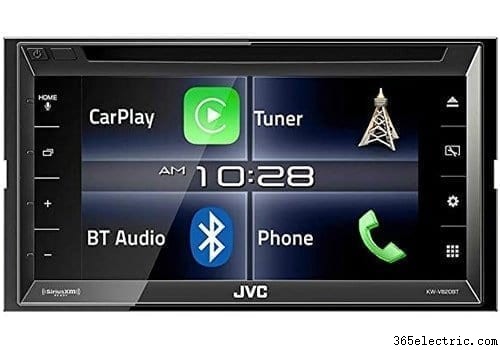
- Mekkora a sztereó nyílásom? A fejegységeknek két fő mérete van:1DIN és 2DIN. Az 1DIN a kisebbik a kettő közül. 1DIN és 2DIN nyílásokba is befér. A 2DIN nagyobb, és jellemzően az érintőképernyős és nagyobb képernyős egységekhez használható. Íme egy példa arra, hogyan néz ki egy 1DIN (balra) és 2DIN (jobbra):
Ha ezeknek a kérdéseknek a feltevésével továbbra is úgy érzi, hogy új fejegységet kell vásárolnia és beszerelnie, íme a következő lépések!
Az autós sztereó beszereléséhez javasolt eszközök
- Phillips és lapos fejű csavarhúzó készlet
- fogók
- Dróteltávolítók
- Kulcsok vagy foglalatok (általában 8 mm, 10 mm)
- Dash kíváncsi eszköz
- Sztereó eltávolítási kulcs (ha szükséges)
- Voltmérő
- Forrasztópáka vagy fáklya
- Forrasztás
- Hőre zsugorodó vagy elektromos szalag
- OR Wire crimps/clamps (if you don't want to solder)
1. Removing The Car Stereo
Well, the first step to installing your new head unit is to remove the old! To do this, we recommend you pop the hood and disconnect your battery before anything. This way, you don't short any fuses. Finding a blown fuse can be time consuming and frustrating so take our word that this will save you time in the long run. Once you have done this, start to remove the trim from around your stereo to access the mounting screws. I've found the trim removal instructions from Metra to be very helpful when you do this. In many cases, trim needs to be pulled in a certain direction to prevent cracking or breaking it. Metra does a great job at helping you visualize how to pull your trim off and where. Go to http://metraonline.com/, scroll down to the vehicle fit guide and enter your car. Once you've done this, click on one of the dash kits (this is the piece of plastic that you'll mount your head unit into. It replaces many parts of your trim to make a seamless fit for your new stereo). If you haven't already bought one of these dash kits, we HIGHLY recommend you do. It will simplify your install by 10 fold. Once you've selected one of the dash kits, click on the PDF link under the “Documents” on the left. You'll find full instructions for removing your trim step by step!
Your head unit will be mounted in one of two ways:
- Bolted to the dash with brackets and screws. This is the more difficult option to removing and where the Metra instructions will be extra helpful.
- Secured with mounting sleeve and spring clips. For this type, you'll want to purchase our recommended stereo removal keys.
Sticking and Stubborn Dash Trim
It's worth noting that removing trim is probably one of the more difficult tasks in removing your car stereo. You're going to be lucky if you don't hit at least one trim piece that isn't a pain. In these cases, you really want to use a trim removal tool to wedge in between the gaps and gently work your way around the trim piece. Patience is key because once you break a trim piece, there's no turning back. Start in a corner and work your way around the piece.
Once you've removed your trim according to the instructions, dismount your factory stereo and disconnect the wiring on the back of the unit.
2. Wiring Your New Car Stereo
If Metra or Scosche carries a wire harness for your vehicle, we highly recommend purchasing one along side the dash kit. Again, you can use the same link from Metra (www.metraonline.com) to find the one for your vehicle. In the case that you can't find one, you'll need to do a little research on the web to find a list of stereo wire colors on your harness and match them up with the corresponding ones on the car stereo harness. You can find a diagram here of aftermarket car stereo wires. This will help you match the aftermarket up with your factory ones.
If you find that there is a custom wire harness for your car, it's very simple, just match up color for color the wires from your aftermarket head unit harness to your custom wire harness for your car.
Connecting the Wires
There's two options for connecting the wires that you can use:
- Soldering – For all of the professional installs that I have done I would solder the two together. This ensures a permanent connection that will never short over time. It's more time consuming though. Here's how you do it:
- Strip the two wires 1/2 inch back.
- (Optional) Place 1 1/2 inch of shrink wrap on one side at least 4 inches behind the end of the wire.
- Overlap the two exposed wires and twist the two together until they are interconnected.
- Using a soldering iron or a soldering torch, heat the wire and feed in your solder slowly until it absorbs into the wire.
- Let cool and test the solder job by tugging on the two wires.
- After the wires cool, move your shrink wrap back over the soldered area. If you didn't use shrink wrap, apply electrical tape.
- Do this for each wire until all have been connected.
- Connectors – You can use butt connectors or crimp caps as well. This is a much more efficient way to connect the wires but in many cases I've seen these fail after a few years on the road. In any case, you'll either crimp the two wires together in a clamp by placing the wires in and clamping down on the crimp clam. Or your use but connectors to insert both ends into the connector and clamp both sides.
3. How to Install the New Stereo
Now that your wires are all completed you're ready to install the head unit. Connect all of the wires first. Ensure that there are no exposed wires that may be in contact with any part of the vehicle. We recommend connecting your battery and testing the stereo out prior to fully installing it back into the dash.
Once you've tested it (and it works!) you'll want to add the mounting brackets to your new head unit. If you have a dash kit, use the ones that come with the kit. If not, use the ones off of your factory stereo. If you have the dash and mounting kit, follow the instructions in the manual. If not, you'll need to test where the new head unit sits, and adjust your factory trim to make it fit. This is normally a difficult task. I'd recommend using a Dremel to make cuts and adjustments to the plastic.
Slide the stereo into the opening in the dash, ensuring that the wires behind are tucked and not pinched. Sometimes this may take a few times when the vehicle has a tight dash opening. Tuck the wires back into an opening behind the unit.
Congratulations! You're done! Let us know you you did and if you have any questions in the comments section.
Also be sure to check out our top rated lists:
Best Single Din Car Stereo
Best In-Dash GPS Navigation Unit
Best DVD/Multimedia Head Unit
Best Digital Media Receiver