Miért sérülnek meg az autóhangszórók habgyűrűi, és hogyan javítsuk ki őket?
Nem sokkal ezelőtt, közvetlenül azután, hogy új ajtó hangszórókat szereltem az autómba, ki kellett vennem egyet és megjavítanom a habgyűrűt.
Szerencsére nem telt el sok idő, mire a hangszórót rögzítették, és visszakerült az autóba, és arra gondoltam, hogy jó ötlet lehet egy cikket írni a hangsugárzók környezetének javításáról.
Általában elmondható, hogy a környező gyűrűn lévő kisebb sérülések kijavításához töltse ki a sérült helyet rugalmas szilikon ragasztóval. A nagyobb sérüléseket és repedéseket vékony folttal kell lefedni, hogy extra szilárdságot kapjanak. A legnagyobb sérülések vagy a környező gyűrűk elszakadása esetén előfordulhat, hogy a teljes gyűrűt újra kell cserélni.
Az alábbi cikkben megmutatom, hogyan lehet megjavítani az autós hangszóró törött habgyűrűjét, így később sokkal tovább élvezheti kedvenc zenéinek hallgatását.
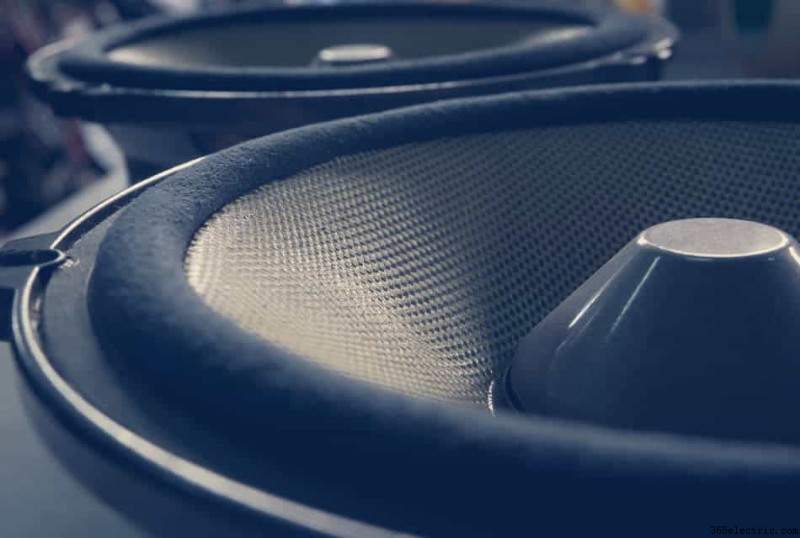
Mi az a hangszóróhabos gyűrű, és mit csinál?
A habgyűrű a hangszóró felfüggesztésének része, amely komplett csomagként működik egy kúppal és egy pókkal. Mind a surround, mind a hangszóró alján található pók középen tart egy kúpot, amely garantálja a hangtekercs szabad mozgását a mágnesrésben.
A hangtekercsnek csak felfelé és lefelé kell mozognia oldalirányú mozgások nélkül, ezért nagyon fontos, hogy a kúpot egyenesen tartsuk.
Az egyik oldalon a környező sérülések, különösen, ha nagyobbak, mint egy defekt, a kúp kissé eltolódik az erősebb oldal felé. Ennek eredményeként, mivel a hangszóróban lévő tekercs már nem párhuzamos a mágnes belsejével, az egyik oldalával túl közel kerül a mágneshez, és zümmögő hangot hallhat.
Ez a pozíció még nagyobb károkat okozhat a hangtekercsben. Extrém esetben dörzsölheti a mágnest, és teljesen tönkremehet. Ne feledje továbbá, hogy ne játsszon olyan hangszórókat, amelyeknek a hangfala van.
A habszivacs környezet viszonylag gyorsan elhasználódik, az autó környezetétől függően több év is eltelhet, mire esetleg javításra szorul.
A jobb minőségű hangszórók gumiból vagy szálból készült burkolatot használnak, amely sokkal tovább tart, mint a hab vagy a papír, de mechanikailag is megsérülhetnek.
Hogyan javítható ki a szakadt hangsugárzó térhangja?
Nemcsak a hangsugárzókúpok sérülnek meg, gyakran előfordul, hogy a hangszóró szakadozni kezd, vagy a szélén lévő vékony gumin keresztül átütöttek valamit.
Ha ezek bármelyike megtörténik, akkor nem kell pénzt költenie az új hangszórókra, és a sérült kúpokhoz hasonlóan egyszerű módok vannak a környezet javítására.
Nem igazán számít, hogy a hangszórók milyen gyűrűanyaggal rendelkeznek, ha az sérült. Hallhatja a csapkodó hangot, különösen a nagy vibrációjú basszushangszórókon. Még egy kis vágás vagy defekt is további károkat okozhat a hangszóróban, ezért próbálja meg javítani, amint meglátja.
A hangsugárzók kerete néhány percen belül javítható, ha kicsi a sérülés, például szakadt élt lát, vagy átszúrja a habot vagy a gumit. Nagyobb szünetek esetén előfordulhat, hogy ki kell cserélni a teljes hangfalat.
Az alábbiakban mindkét forgatókönyvhöz részletes útmutatót talál. Menjünk tovább, és kezdjük az egyszerű javításokkal.
Hogyan javítható a hangsugárzó surround?
A sérült hangszóróhab vagy gumigyűrűk rögzítéséhez nincs szükség speciális szerszámokra. Használjon kést, szikét vagy ollót. Ragasztóként nemrégiben Parts Express Speaker Repair Glue-t használtam, és a tömítés nagyszerű volt.
De ha defektet vagy nagyobb repedést észlel, még néhány lépést meg kell tennie a hangszóró javításához.
A hab- vagy gumigyűrű javításának első lépése ennek a területnek a tisztítása. Szokásos körömlakklemosót használok, tökéletesen tisztítja a gumikat és a habokat.
Amikor a hab mindkét oldalon tiszta, fordítsa meg a hangszórót, és hagyja ráülni a környezetre. Ez a pozíció kiváló, mert a hangszóró súlya segít összetartani mindkét ragasztani kívánt részt.
Ha egy nagyobb mélysugárzón dolgozik, aminek nagy a kúp mozgása, akkor érdemes ezt a területet egy extra folttal lefedni. Az elkészítéséhez használjon vékony habot, és vágjon egy kis darabot, amely fedezi a sérülést.
Vegyünk egy keveset a szilikonból, és fedjük le az egész sérült területet, de ne tegyen túl sokat. Fedje le a tapaszt is a ragasztóval, és ragassza a gyűrűre.
Ne hagyjon rést a széleken, és ha ilyet észlel, adjon hozzá még ragasztót, hogy alaposan kitöltse a rést. Most elkészült az alsó oldalon, fordítsa meg a hangszórót, és helyezze rá a mágnesre.
Ismételje meg a folyamatot a hangszóró felső oldalán. Töltse ki a lyukat vagy repedést vékony ragasztóréteggel, majd ragassza fel a tapaszt a gyűrűre.
Nyomjon enyhén a javított területet, ujjával dörzsölheti át a tapaszt.
Ha végzett, hagyja a hangszórót szellőző helyen egy éjszakára, hogy teljesen megszáradjon. Néha tovább tarthat a száradás, ez a használt ragasztótól függ. Ritka esetekben előfordulhat, hogy 48 órát kell várnia.
Hogyan cserélhető ki a hangsugárzó surround?
Bonyolultabb az egész környező lemez cseréje, de ne aggódjon, ez is egyszerű, ha a lépéseket a megfelelő sorrendben követi.
#1. Vágja le a gyűrűt a kúp széléről. Ügyeljen arra, hogy óvatosan tegye, hogy ne sértse meg a kúpot.
#2. Távolítsa el a habot a széléről, és tisztítsa meg az összes törmeléket, ahol a környező területet ragasztják.
#3. Vegyünk egy új környező gyűrűt, és fedjük le a belső részt egy ragasztóréteggel. Ne tegyen túl kevés ragasztót, mert a kúp és a környezet közötti kapcsolatnak szilárdnak és teljesen tömítettnek kell lennie. Ezenkívül ne ragasszon egyidejűleg a gyűrű belsejét és külsejét. Ezzel azt kockáztatja, hogy a hangtekercs a közepén kívülre kerül, és ez megölheti a hangszórót.
#4. Fordítsa meg a környező területet, és ragassza a ragasztott területet a kúp széléhez. Make sure the surrounding is centred over the cone. For better sticking to the cone, apply some pressure on the glued edges, you can gently tap it all around with a finger.
#5 . This step is the most important in the whole replacement. You will have to glue the ring to the speaker surrounding making sure that the cone is centred against the magnet.
The video below shows the great and fast way how to centre the voice coil and test a speaker at the same time.
Another way to centre the voice coil is to remove a dust cap and use shims. This method, however, may not work in all car speakers due to their size.
#6. When the voice coil is centred, you can connect the foam ring to the speaker basket. Apply glue over the whole area and gently push a speaker ring down until it touches the basket. Rub fingers over the all surround, making sure it will stick to the basket with no gaps in between.
#7. After gluing, it is good to keep both parts together. You can use plastic clips and leave the speaker overnight. The next day when the glue is dry, push a cone a few times down, and if you do not feel any rubbing, the speaker is ready to be installed in the car.
How to Protect Speaker Foam Ring From Damages?
For mechanical damages, try to cover speakers with grills, and if not possible, try not to place any heavy sharp object in front of the speakers.
To prevent tears on the foam or rubber rings, do not keep speakers in a high humid condensation. It may be difficult during rainy days, but when you often use AC in a car, the air should dry the speakers’ surface quickly.
Also, sunlight is a killer for soft foam. Especially, when you have speakers in the dashboard or in the rear deck, they are exposed to the sunlight for the whole day, and that does not increase their lifetime at all. Tinted windows may help but not on the dashboard.
To protect your surroundings from tearing too fast, you can cover them with lubricate, like INTERIOR RESTORER CREAM from ArmorAll.
The extra coating will prevent foam from drying too quickly and can add a few more years to your speakers’ lifetime. For the best effect, try to cover both sides of the surrounding.
It may not always be possible to access this area in the smallest speakers, but you can use thin ear sticks with a little cream at the end and rub it gently.
It is essential to check the speakers from time to time. If you notice any signs of damage to the surroundings, try to repair them as soon as you can. This way, you can prevent more complicated repairs in the future.
I am checking my speakers twice per year before and after winter, and so far, they are in good condition. I am going to keep it that way also for the new speakers.
GYIK
How to Fix a Torn Speaker Surround?
The most common type of damage to speaker surrounds is tearing. This can be caused by the speaker’s age, sun exposure, or simply when using the speaker too much.
There are two ways to fix this problem:you can either replace the surround or repair it.
If the tear is small, you may be able to repair it with glue. The best type of glue to use is a cyanoacrylate adhesive, also known as super glue.
This will bond the surround material with the speaker basket and the cone and make it strong enough to last for a long time.
If the tear is large, you will need to replace the surround. This is not a difficult task, but it does require some patience.
You will need to remove the old surround and install the new one. Make sure that you use the same type of glue that you used to repair the small tear.
How to Replace Speaker Surround?
Replacing the speaker surround is more complicated than repairing it because the cone will be free after removal.
Hence, keeping the cone in the speaker’s centre while installing a new surround is critical. Otherwise, the speaker will not work correctly.
#1. Remove the old surround:Use a razor blade or sharp knife to cut around the edge of the old surround. Be careful not to damage the cone.
#2. Install the new surround:Apply a thin layer of glue around the edge of the cone. Then, align the new surround with the edge of the cone and press it into place.
#3. Let the glue dry:Once the glue has dried, your speaker will be as good as new!
#4. Test the speaker:Make sure the speaker is working correctly before using it.
What Kind of Glue Is Used for Speaker Surrounds?
The best type of glue to use is a cyanoacrylate adhesive, also known as super glue.
This will bond the surrounding material together and make it strong enough to last for a long time. Super glue is also great because it dries quickly, so you won’t have to wait long for your speaker to be ready to use.
What Does It Mean Refoam a Speaker?
Refoaming speakers involve replacing the foam surround attached to the speaker cone.
The foam surround helps keep the cone in place and absorbs any vibrations. However, over time, the foam surround can degrade and cause the speaker to sound distorted, especially in the car speakers used in harsh conditions.
To keep the speaker in good condition, the surrounding should be replaced.
How Much Does It Cost to Have a Speaker Refoamed?
The cost of having a speaker refoamed will depend on the speaker itself and the surrounding type you use.
Generally speaking, it will cost between $40 and $100 per speaker, it is therefore not recommended for cheaper speakers.
How to Repair Torn Speaker Foam?
If your speaker foam is torn in a large area, then it needs to be replaced.
You can replace the foam yourself, but it is best to leave it to a professional, especially when you do not have experience with repairing speakers.
How to Repair Subwoofer Foam Surround?
Repairing foam surround on a subwoofer is not much different from fixing a speaker’s surround, but the materials used have to be much stronger.
To repair the subwoofer’s foam surround, follow the steps below:
#1. Remove the subwoofer from the enclosure. This will give you better access to the foam surround.
#2. Use a sharp knife to trim away any loose or damaged bits of foam surround.
#3. Apply a generous amount of glue to the new foam surround.
#4. Place the new foam surround onto the subwoofer cone.
#5. Use a clamp or heavy object to hold the new foam surround in place while the glue dries.
#6. Once the glue has dried, reassemble the subwoofer and place it back into the enclosure.
The above steps work in case of minor damages, but when the subwoofer’s surrounding is bad over a larger than two inches area, the subwoofer’s surrounding has to be replaced.
Can I Replace the Foam Surrounding With a Rubber?
Many people prefer to replace the foam surround with a rubber surround. This is because rubber surrounds last longer than foam, producing a better bass response.